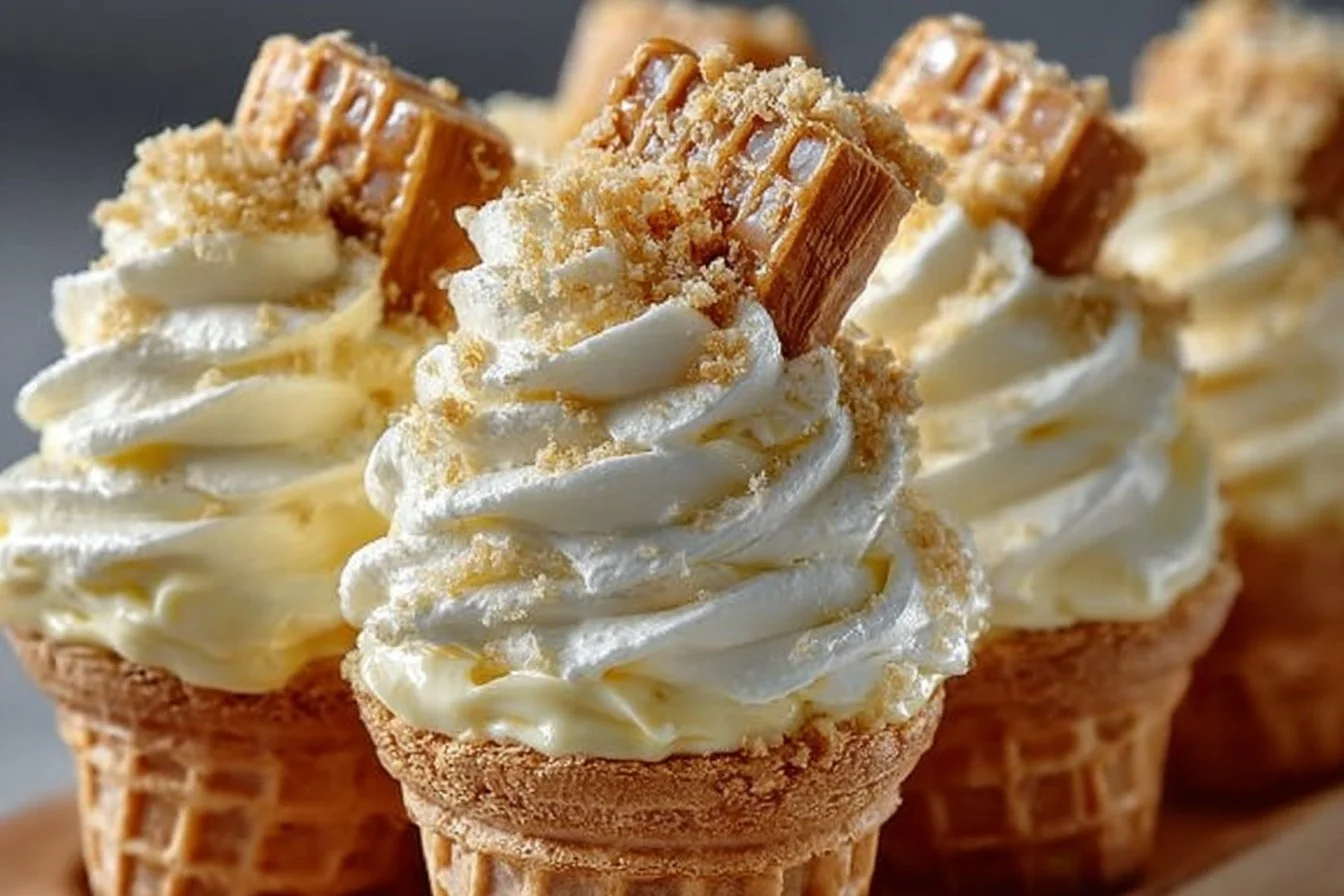
If you love creamy, dreamy desserts that deliver layer upon layer of flavor, you’re in the right place! Banana Pudding Cheesecake Cones are the ultimate treat for anyone who enjoys the combination of classic banana pudding and velvety cheesecake, all packed into a crunchy, hand-held waffle cone. Imagine the first bite: rich cheesecake filling, luscious banana pudding, sweet wafers, all mingling together in perfect harmony. Fun fact: this recipe was inspired by the nostalgia of Southern banana pudding, reimagined in a brand-new, portable form. This dessert is not just quick and simple to make, it’s also fun for kids and adults alike! If you enjoyed my fan-favorite Strawberry Shortcake Trifles, you’ll adore how Banana Pudding Cheesecake Cones turn every gathering or weeknight dinner into a special celebration. Get ready to wow your taste buds—and your guests!
What is Banana Pudding Cheesecake Cones?
Now, you might be wondering: what on earth are Banana Pudding Cheesecake Cones? Well, let’s break it down with a little chuckle! If a cheesecake met banana pudding at the fair and fell in love with a crunchy waffle cone, this would be their delicious offspring. It’s one part Southern comfort and one part carnival delight—truly, the best of both worlds! Who says you can’t have your pudding and eat it in a cone, too? As the wise old saying goes, “the way to a man’s heart is through his stomach,” and I can guarantee these cones are the express route! If you’re up for trying something a little quirky but oh-so-tasty, grab your ingredients and get ready to give this recipe a whirl.
Why You’ll Love This
There’s so much to adore about Banana Pudding Cheesecake Cones! First, the main highlight: you get all the flavors of a classic banana pudding and creamy cheesecake in every single bite—plus, the crispy cone adds a delightful crunch that keeps you coming back for more. Second, making these at home is a wonderful way to save cash compared to buying desserts at a specialty bakery or ice cream shop, and you’re completely in control of the quality of ingredients. Lastly, those flavorful toppings—think freshly sliced bananas, billows of whipped cream, caramel drizzle, and extra vanilla wafers—elevate this already-delicious dessert to something spectacular! If you loved my Cookies & Cream Stuffed Cups, this recipe offers a similarly playful twist on a classic. Try making Banana Pudding Cheesecake Cones at home and discover your new go-to dessert.
How to Make
Quick Overview
Banana Pudding Cheesecake Cones are delightfully easy to make and serve. You only need about 20 minutes of hands-on prep, plus some chilling time to let that creamy filling set up just right. The steps are straightforward—no baking required!—and the end result is a beautifully layered, crowd-pleasing dessert that’s as fun to make as it is to eat. Cream cheese and banana pudding team up for a rich, silky texture, with crunchy vanilla wafers and fresh bananas ensuring every bite pops with flavor and contrast.

Ingredients
- 8 oz cream cheese, softened
- 1/2 cup powdered sugar
- 1/2 teaspoon vanilla extract
- 1/2 cup heavy cream, whipped
- 1 box (3.4 oz) instant banana pudding mix
- 1 1/2 cups cold milk
- 1 banana, sliced
- 6 waffle cones
- 1/2 cup crushed vanilla wafers
- Whipped cream (for topping)
- Caramel drizzle (optional)
- Extra vanilla wafers and banana slices for garnish
Step-by-Step
- In a mixing bowl, beat the softened cream cheese until smooth and creamy.
- Add the powdered sugar and vanilla extract, mixing until fully blended and no lumps remain.
- Fold in the whipped cream gently until the mixture is light and fluffy.
- In a separate bowl, whisk the instant banana pudding mix with the cold milk for 2 minutes until slightly thickened.
- Combine the banana pudding mixture with the cheesecake mixture, folding gently until both are fully incorporated.
- Fill each waffle cone about halfway with spoonfuls of the cheesecake-banana pudding mixture.
- Add a couple of banana slices and a sprinkle of crushed vanilla wafers on top of the first layer.
- Fill the cones to the top with more cheesecake-pudding mixture.
- Top each cone with a swirl of whipped cream, more crushed wafers, a drizzle of caramel (if using), and extra banana slices and vanilla wafer pieces as garnish.
- Serve immediately or chill the cones for up to 2 hours before serving for a firmer texture.
What to Serve Banana Pudding Cheesecake Cones With
Banana Pudding Cheesecake Cones are the perfect capstone to a casual summer BBQ or family dinner. They pair wonderfully with grilled burgers or fried chicken for a classic American meal. Want to round out dessert? Serve alongside fresh berries or a crisp iced coffee for an afternoon pick-me-up. For parties, set up a DIY cone bar with various toppings so everyone can customize their treat!
Top Tips for Perfecting
- Always use ripe bananas for the sweetest, most flavorful dessert.
- Make sure your cream cheese is softened for easy blending—no one likes lumps!
- If you don’t have instant banana pudding mix, vanilla pudding works in a pinch (just add a touch of banana extract).
- Prep your cones right before serving to avoid sogginess.
- To save time, you can prepare the cheesecake-pudding filling ahead and refrigerate until you’re ready to assemble.
- Crushed graham crackers can be swapped for vanilla wafers for a different twist.
- For an extra-special touch, drizzle the inside of each waffle cone with melted chocolate before filling.
Storing and Reheating Tips
For best results, assemble Banana Pudding Cheesecake Cones right before serving. If you have leftovers, you can store the cheesecake-pudding filling—without the cones—in an airtight container in the fridge for up to three days. The cones themselves are best fresh, but you can store them at room temperature in a sealed bag for up to two days. If you’d like to prep ahead, keep the components separate until ready to serve. This dessert doesn’t need reheating, and freezing is not recommended as it affects texture.
FAQs
Can I use homemade banana pudding instead of instant mix?
Absolutely! Homemade banana pudding works wonderfully and can give your dessert even richer flavor.
How do I keep the cone from getting soggy?
Assemble the cones just before serving, and avoid overfilling with very wet ingredients.
Can I use gluten-free cones and wafers?
Yes, simply substitute gluten-free waffle cones and vanilla wafers to make this dessert gluten-friendly.
Is this recipe kid-friendly?
Definitely! Kids love helping to layer the ingredients and choose their toppings.
What other fruits can I use?
Try swapping in strawberries or blueberries for a fun variation—or even mix multiple fruits for a tropical twist!
Conclusion
Banana Pudding Cheesecake Cones are everything you love about dessert—creamy, crunchy, fruity, and completely irresistible—all wrapped up in a playful cone you can hold in your hand. Whether you’re hosting a summer get-together or simply treating yourself to something delicious, this recipe delivers all the nostalgic flavors you crave with a fresh, creative twist. Fun to make and even more fun to eat, these cones are sure to become a new family favorite. Give them a try, and don’t forget to explore the rest of the blog for more sweet inspiration!

Banana Pudding Cheesecake Cones
Equipment
- Mixing Bowl
Ingredients
Ingredients
- 8 oz cream cheese, softened
- 1/2 cup powdered sugar
- 1/2 teaspoon vanilla extract
- 1/2 cup heavy cream, whipped
- 1 box (3.4 oz) instant banana pudding mix
- 1 1/2 cups cold milk
- 1 banana, sliced
- 6 waffle cones
- 1/2 cup crushed vanilla wafers
- whipped cream (for topping)
- caramel drizzle (optional)
- extra vanilla wafers and banana slices for garnish
Instructions
- In a mixing bowl, beat the softened cream cheese until smooth and creamy.
- Add the powdered sugar and vanilla extract, mixing until fully blended and no lumps remain.
- Fold in the whipped cream gently until the mixture is light and fluffy.
- In a separate bowl, whisk the instant banana pudding mix with the cold milk for 2 minutes until slightly thickened.
- Combine the banana pudding mixture with the cheesecake mixture, folding gently until both are fully incorporated.
- Fill each waffle cone about halfway with spoonfuls of the cheesecake-banana pudding mixture.
- Add a couple of banana slices and a sprinkle of crushed vanilla wafers on top of the first layer.
- Fill the cones to the top with more cheesecake-pudding mixture.
- Top each cone with a swirl of whipped cream, more crushed wafers, a drizzle of caramel (if using), and extra banana slices and vanilla wafer pieces as garnish.
- Serve immediately or chill the cones for up to 2 hours before serving for a firmer texture.