Ever wondered what makes Dairy Queen Ice Cream Cake so legendary? Is it the velvety layers, the crunchy cookie surprise, or the gooey fudge center? Maybe it’s a bit of culinary magic—and, as they say, the way to a man’s heart is through his stomach! This iconic treat isn’t just any cake; it’s a frozen wonderland of flavors and textures, perfect for hot days or joyous celebrations. Whether you call it an ice cream dream or the king of party cakes, one thing’s for sure: you’re going to want to slice into this ASAP. Ready to wow your guests and cool down at the same time? Give this recipe a try and taste the magic for yourself!
Why You’ll Love This
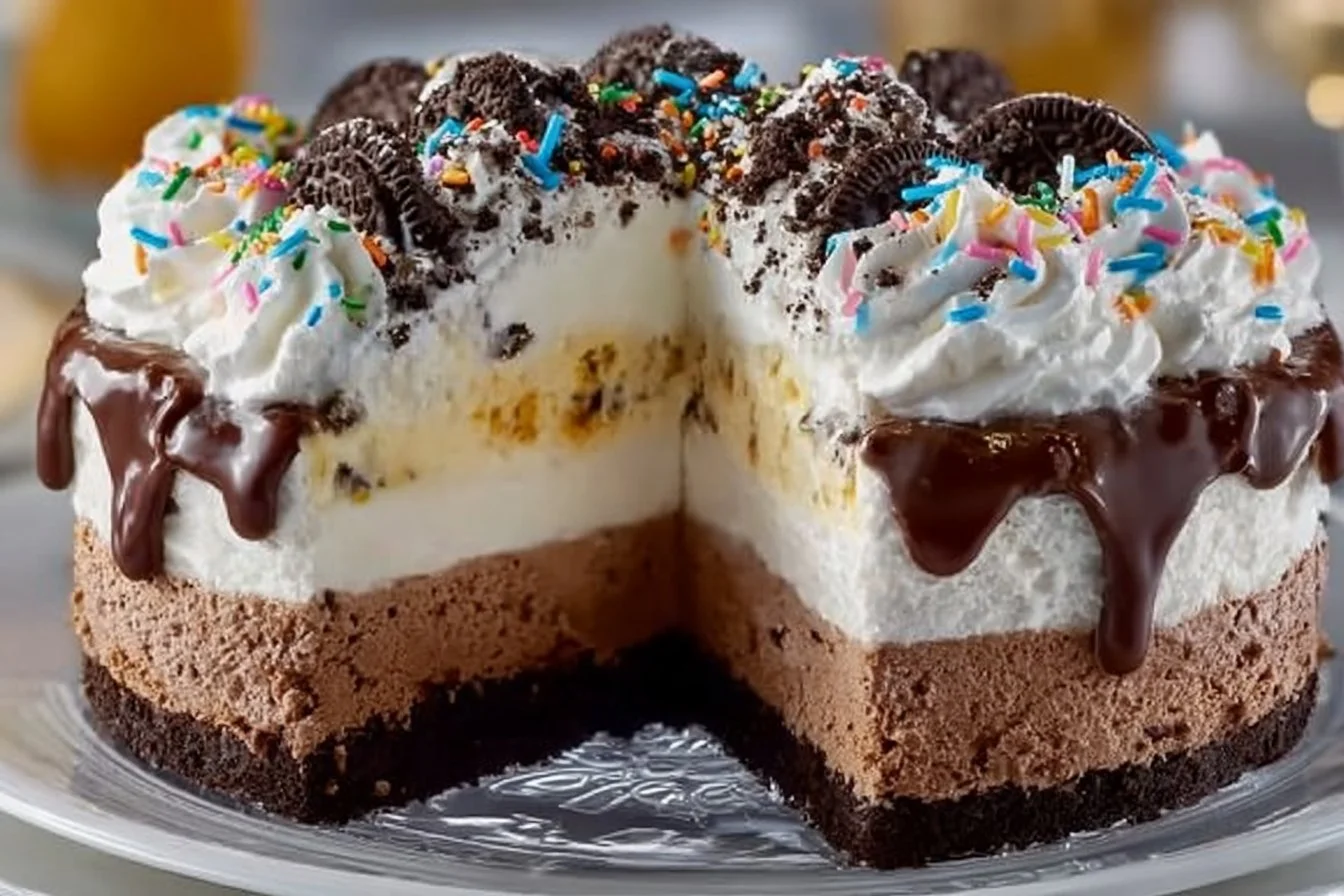
Prepare for your next party to soar to superstar status! The main reason to fall head-over-heels for this Dairy Queen Ice Cream Cake is the luscious combination of creamy vanilla and chocolate ice cream, a thick ribbon of fudge, and that unforgettable cookie crunch base. Making it at home doesn’t just save money (store-bought cakes can be pricey!)—it also lets you add your signature touch, from swirl patterns to extra sprinkles. The decadent fudge sauce and fluffy whipped cream icing take every bite to a new level of delight. If you adored our Easy No-Bake Oreo Cheesecake, you’ll love how this cake turns simple ingredients into something extraordinary. Trust us—one scoop, and you’ll be hooked. Don’t just dream about it; make it happen in your own kitchen tonight!
How to Make
Quick Overview
Making your own Dairy Queen Ice Cream Cake is a breeze—and the taste is simply unforgettable. This cake comes together in just a few simple steps, with hardly any “bake time” (it’s all about assembling and freezing!). You get a soft, cake-like texture with rich, velvety ice cream and a dreamy chocolate center, topped off with homemade whipped cream and colorful sprinkles. With only about 30 minutes of hands-on preparation (plus chilling time), you’ll be ready to impress guests and enjoy a showstopping dessert.
Ingredients
- 20 chocolate sandwich cookies with the cream center, crushed
- 4 tablespoons salted sweet cream butter, melted
- 1 quart chocolate ice cream
- 1 quart vanilla ice cream (vanilla bean flavor works best)
- 11.75 ounces hot fudge topping
- 2 cups cold heavy cream
- 1 cup powdered sugar
- 1 teaspoon clear vanilla flavoring
- Colorful sprinkles (optional garnish)
Instructions
- Make the crust
Combine the crushed chocolate sandwich cookies and melted butter in a bowl. Stir until it resembles wet sand. Press firmly into the bottom of a 9-inch springform pan. Freeze for 10–15 minutes. - Soften the ice cream
Let both the chocolate and vanilla ice cream soften slightly at room temperature for easy spreading. - Assemble the cake
- Spread the chocolate ice cream evenly over the chilled crust.
- Spoon and spread the hot fudge topping over the chocolate layer.
- Spread the vanilla ice cream gently on top of the fudge layer.
- Freeze the layers
Cover the cake with plastic wrap or foil and freeze for at least 4 hours or overnight until completely firm. - Prepare the whipped topping
In a chilled mixing bowl, beat the heavy cream on high until soft peaks form. Add powdered sugar and clear vanilla, continuing to whip until fluffy and stiff. - Frost and decorate
Remove the frozen cake from the springform pan. Frost the top and sides with whipped cream. Add sprinkles or your favorite decorations. - Slice and serve
Use a sharp knife dipped in warm water for clean slices. Serve immediately and enjoy the creamy, crunchy, chocolaty layers!
What to Serve With
Pair this chilled beauty with warm drinks like coffee or hot cocoa in the cooler months, or iced tea and lemonade when it’s warm out. Add a scoop of fresh fruit salad for a refreshing contrast or set up a DIY topping bar with crushed cookies, sauces, and candies. Want to go big? Serve alongside brownie bites, peanut butter pie, or even mini milkshakes for a full dessert spread worthy of any celebration!
Top Tips for Perfecting Dairy Queen Ice Cream Cake
- Let the ice cream soften slightly before spreading to avoid tearing the layers or melting the crust.
- A springform pan is key for easy, picture-perfect removal.
- Chill the assembled cake thoroughly—overnight is best—for clean slices.
- Make the whipped cream fresh just before frosting for the fluffiest texture.
- Switch up the flavors: try coffee, mint chip, strawberry, or cookies and cream to make it your own.
- Use a hot knife (dip in warm water) for slicing—wipe clean between each cut for a beautiful presentation.
Storing and Reheating Tips
Store the ice cream cake in the freezer, tightly covered with plastic wrap or in an airtight container. It will stay fresh for up to 7 days. For best flavor and texture, allow it to sit at room temperature for 5–10 minutes before slicing. Never microwave ice cream cake—just thaw slightly and serve cold. You can even slice the cake into individual servings, wrap them, and freeze for convenient single portions.
FAQs
Can I use different flavors of ice cream?
Yes! Get creative with your favorite flavors—peanut butter, caramel swirl, or Neapolitan are all great options.
Do I have to use a springform pan?
It helps with easy removal, but you can use a deep cake pan lined with parchment paper for similar results.
What’s the best way to make it ahead of time?
Assemble and freeze the cake layers a day in advance, then frost and decorate with whipped cream just before serving.
Can I use store-bought whipped cream?
Sure, but homemade has a lighter, fresher taste and holds up better for frosting.
How can I make it gluten-free?
Use gluten-free sandwich cookies for the base and check your ice cream labels to ensure they’re gluten-free too.
Conclusion
Making your own Dairy Queen Ice Cream Cake at home is not only easy and rewarding—it turns any gathering into a party. With layers of smooth ice cream, rich fudge, and a crunchy cookie crust, it tastes just like (or better than!) the original. This recipe shows that you don’t need fancy equipment or special skills—just a few simple ingredients and a bit of freezer time. So gather your loved ones, serve up a slice, and celebrate life’s sweet moments with this crowd-pleasing classic. Don’t forget to try out more no-bake desserts and share your creations with us. Happy scooping!

Dairy Queen Ice Cream Cake
Equipment
- Mixing Bowl
- Springform Pan
- Electric Mixer
Ingredients
Crust
- 20 pieces Chocolate sandwich cookies, crushed
- 4 tablespoons Salted sweet cream butter, melted
Ice Cream Layers
- 1 quart Chocolate ice cream
- 1 quart Vanilla ice cream Vanilla bean flavor works best
- 11.75 ounces Hot fudge topping
Whipped Topping
- 2 cups Cold heavy cream
- 1 cup Powdered sugar
- 1 teaspoon Clear vanilla flavoring
- Colorful sprinkles Optional garnish
Instructions
- Combine the crushed chocolate sandwich cookies and melted butter in a bowl. Stir until it resembles wet sand. Press firmly into the bottom of a 9-inch springform pan. Freeze for 10–15 minutes.
- Let both the chocolate and vanilla ice cream soften slightly at room temperature for easy spreading.
- Spread the chocolate ice cream evenly over the chilled crust. Spoon and spread the hot fudge topping over the chocolate layer. Spread the vanilla ice cream gently on top of the fudge layer.
- Cover the cake with plastic wrap or foil and freeze for at least 4 hours or overnight until completely firm.
- In a chilled mixing bowl, beat the heavy cream on high until soft peaks form. Add powdered sugar and clear vanilla, continuing to whip until fluffy and stiff.
- Remove the frozen cake from the springform pan. Frost the top and sides with whipped cream. Add sprinkles or your favorite decorations.
- Use a sharp knife dipped in warm water for clean slices. Serve immediately and enjoy the creamy, crunchy, chocolaty layers!