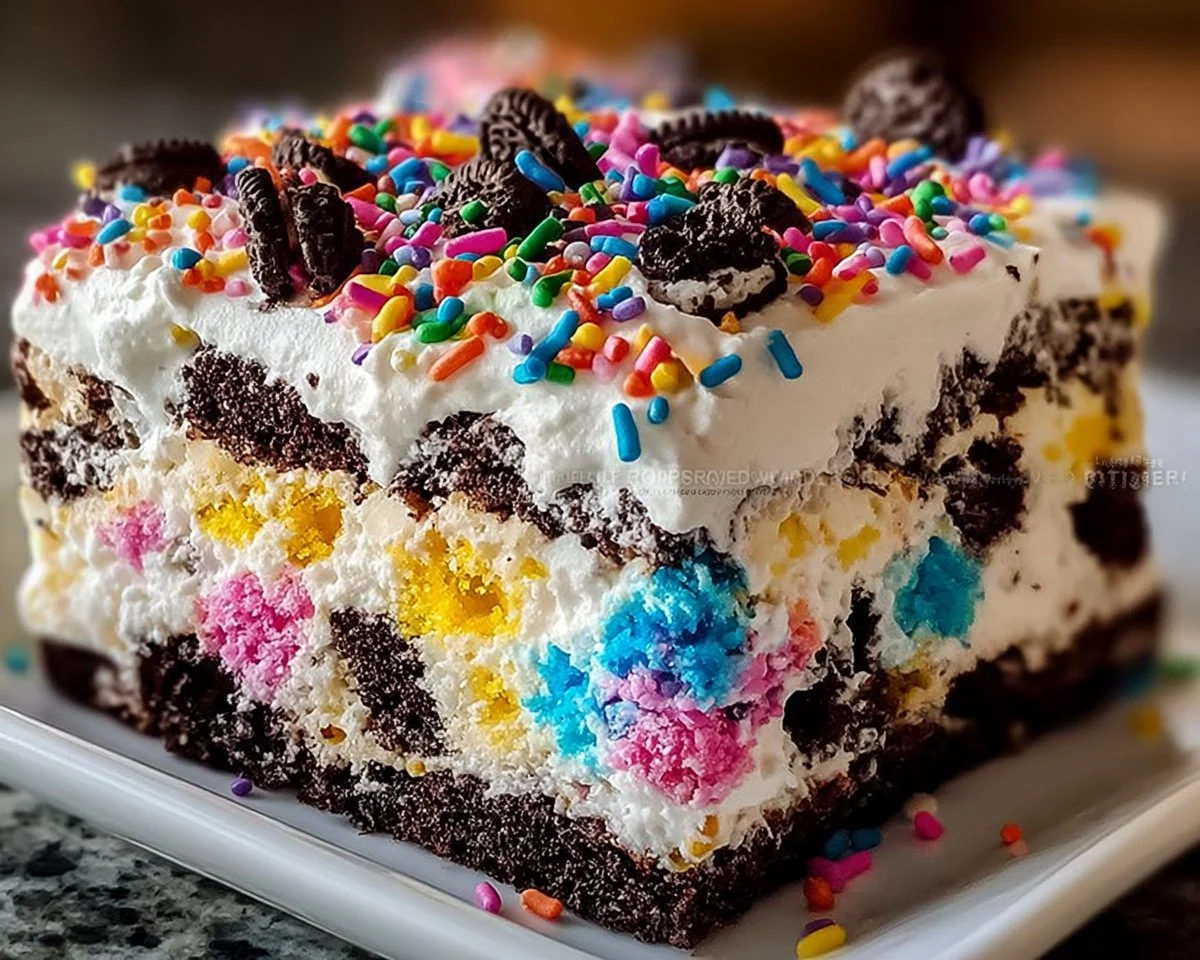
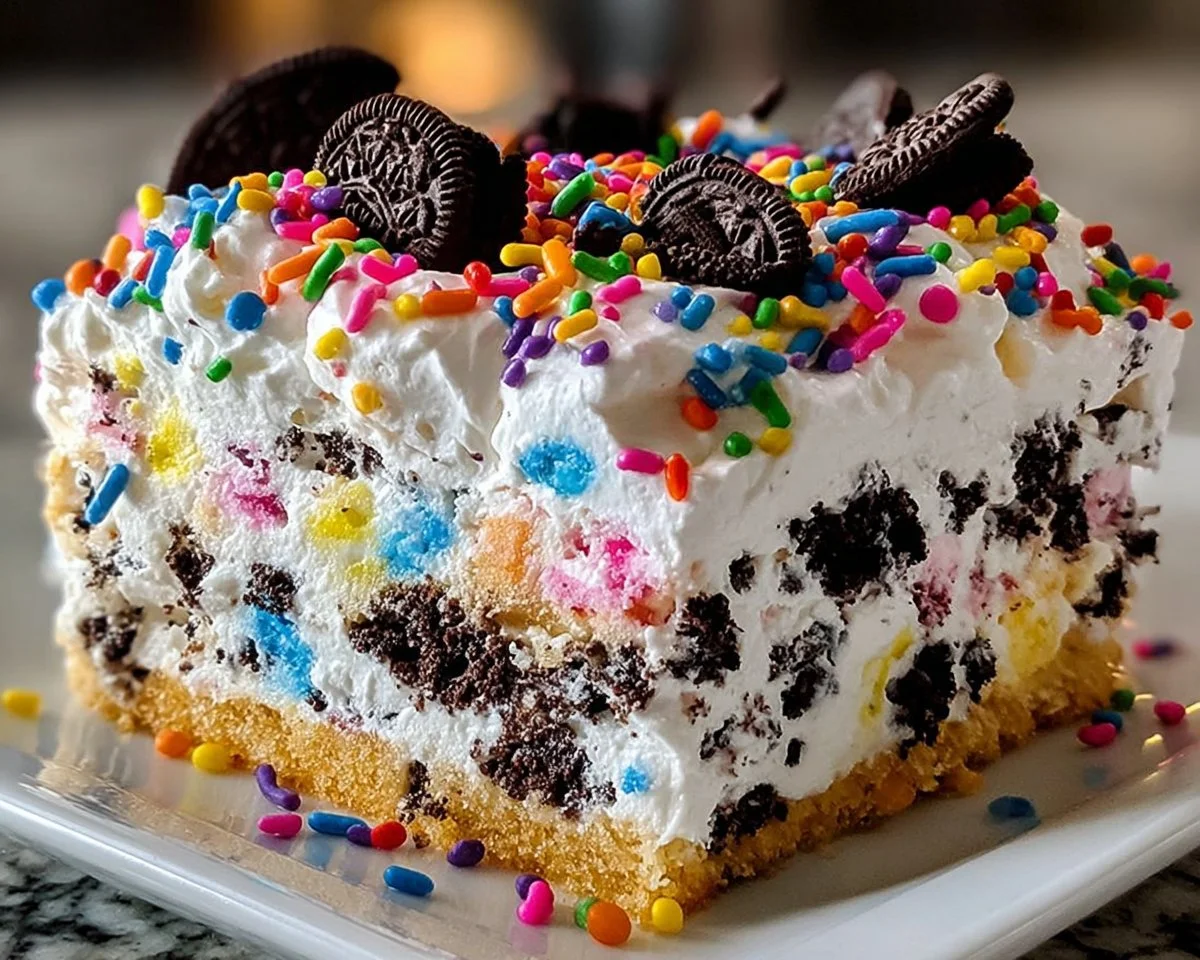
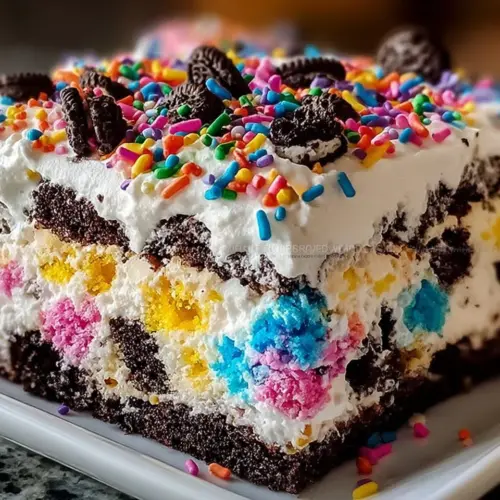
Creamy, colorful, and delightfully simple — the No-Bake Funfetti Oreo Icebox Cake is a celebration in every slice. Imagine layers of Birthday Cake Oreos cradled in a cloud of whipped cream and cream cheese, finished with a shower of rainbow sprinkles. It’s the kind of dessert that’s as effortless as it is show-stopping, perfect for last-minute parties or weekend treats. Fun fact: icebox cakes date back to the early 20th century when refrigeration became common and home cooks loved assembling chilled layered desserts. If you like fuss-free sweets, try this No-Bake Funfetti Oreo Icebox Cake recipe — it’s almost as easy as grabbing cookies from the jar, but infinitely more impressive. Grab a spoon and let’s get festive.
What is No-Bake Funfetti Oreo Icebox Cake?
What exactly makes this dessert an icebox cake? Think of it as an easy, no-bake layered dessert that sets up in the refrigerator instead of the oven. Why is it called Funfetti Oreo icebox cake — because it uses Birthday Cake Oreos and sprinkles to feel like a party in every bite. Who invented it? Probably someone with a sweet tooth and a soft spot for convenience. And who doesn’t love the idea that “the way to a man’s heart is through his stomach.” Want something quick, fun, and nostalgic? Try this recipe and see how fast it disappears from the plate.
Why You’ll Love This
- Party-perfect celebration: The colorful Oreos and sprinkles make every slice look festive without any piping or decorating skill.
- Wallet-friendly and fast: Store-bought cookies and everyday dairy keep costs low and prep time minimal — save money compared to bakery cakes.
- Texture and flavor contrasts: Creamy, slightly tangy cream cheese whipped with airy heavy cream meets crisp cookie layers and crunchy sprinkles for the ultimate bite.
If you enjoy simple no-bake desserts, you’ll also love the velvety sensation of the Choco Nirvana Mousse Cake for a richer chocolate option. Ready to try something bright, easy, and irresistibly fun? Make it this weekend.
How to Make:
Quick Overview
This icebox cake is straightforward: whip, fold, layer, chill. No baking, no special equipment — just a mixer or whisk, a 9×13 inch dish, and patience while it chills. The result is a lush, creamy filling that soaks into the Oreo layers for a soft yet textured finish. Prep time is about 15–20 minutes with at least 4 hours chilling (overnight is best). The standout element is the light, pillowy cream cheese-whipped cream filling that transforms cookies into a cake-like slice.
Ingredients
2 packages Birthday Cake Oreos (use sealed packages, room temperature)
2 cups heavy cream (cold, for best whipping)
1 cup cream cheese, softened (room temperature for easy mixing)
1 cup powdered sugar (sifted if lumpy)
1 teaspoon vanilla extract (pure vanilla gives best flavor)
1/2 cup colorful sprinkles (jimmies or non-melting sprinkles)
Directions
- Chill your mixing bowl and beaters in the fridge for 10 minutes if possible; cold equipment helps heavy cream whip faster.
- In a mixing bowl, pour the 2 cups heavy cream and beat with an electric mixer on medium-high until stiff peaks form, about 3–4 minutes. Stiff peaks mean the cream holds its shape without collapsing.
- In another large bowl, add 1 cup softened cream cheese, 1 cup powdered sugar, and 1 teaspoon vanilla extract. Beat until smooth and completely lump-free.
- Gently fold the whipped cream into the cream cheese mixture in two additions. Use a rubber spatula and fold carefully to keep the mixture light and airy.
- In a 9×13 inch dish, arrange a single layer of Birthday Cake Oreos across the bottom. It’s fine if you need to break a cookie to fit at the edges.
- Spread half of the cream mixture evenly over the Oreo layer using an offset spatula or the back of a spoon, covering all cookies.
- Add another full layer of Oreos on top of the cream, pressing gently to ensure contact with the filling.
- Spread the remaining cream mixture over the second layer of Oreos and smooth the surface. Sprinkle 1/2 cup colorful sprinkles across the top for a festive finish.
- Cover the dish tightly with plastic wrap and refrigerate for at least 4 hours, though overnight yields cleaner slices. When set, slice with a sharp knife and serve chilled.
What to Serve With:
- Fresh berries such as strawberries or raspberries to cut through the sweetness and add freshness.
- A simple espresso or cold brew for adults who like a bitter contrast.
- Vanilla bean ice cream for extra creaminess if you want a dessert-lover’s dream plate.
- A light fruit salad or citrus sorbet to balance richness for summer gatherings.
Top Tips for Perfecting:
- Use cold heavy cream and chilled equipment to get the best whipped cream volume.
- If your cream cheese has lumps, beat it on its own first to smooth it out before adding sugar and vanilla.
- For a sturdier dessert, press the layers with the back of a spatula and chill overnight; this makes cleaner slices.
- Swap Birthday Cake Oreos for chocolate or golden Oreos to vary flavor — or crush a few Oreos and fold them into the cream for Oreo-studded filling.
- Avoid overwhipping the cream to prevent it from turning grainy or becoming butter.
- For a gluten-free option, use gluten-free sandwich cookies and ensure sprinkles are GF.
For bite-sized, boozy dessert fun, you might also enjoy the No-Bake Baileys Cheesecake Balls as an alternative party treat.
Storing and Reheating Tips:
- Refrigeration: Store the icebox cake covered in the fridge for up to 4 days. Keep it tightly wrapped to prevent it from absorbing other fridge odors.
- Freezing: You can freeze the cake for up to 1 month. Wrap it tightly in plastic wrap and then in foil. Thaw overnight in the refrigerator before serving.
- Shelf life: Best enjoyed within 2–3 days for optimal texture; cookies continue to soften the longer it sits.
- Reheating: No reheating needed — this is a chilled dessert. If frozen, thaw slowly in the fridge to maintain creamy texture.
FAQs
Can I use a different type of Oreo or cookie?
Yes. Chocolate, golden, or even gluten-free sandwich cookies work. Different cookies change the flavor and texture; chocolate Oreos add richness, golden Oreos keep it lighter.
Can I make this dairy-free or vegan?
You can try dairy-free cream cheese and coconut whipping cream, but texture and flavor will vary. Use vegan sandwich cookies and non-dairy whipped topping designed for stability.
How long should I chill the icebox cake before serving?
Chill at least 4 hours, but overnight gives the best set and clean slicing.
Can I prepare this ahead for a party?
Absolutely. Make it a day ahead and keep refrigerated until serving. It’s even better after a night of chilling.
Why did my filling separate or become runny?
This usually happens if the cream wasn’t whipped enough or if the cream cheese was too cold and lumpy. Ensure cream is whipped to stiff peaks and cream cheese is softened before mixing.
Conclusion
This No-Bake Funfetti Oreo Icebox Cake is proof that show-stopping desserts don’t need hours in the kitchen. It’s simple to assemble, budget-friendly, and irresistibly festive — a perfect go-to for birthdays, potlucks, or whenever you want an easy celebration on a plate. Give it a try, share it with family and friends, and enjoy how something so simple can delight so many. For the original inspiration and a close variation, see the full write-up at No-Bake Funfetti Oreo Icebox Cake on The Domestic Rebel.
No-Bake Funfetti Oreo Icebox Cake
Equipment
- Mixing Bowl
- Electric Mixer
- 9x13 inch Dish
Ingredients
Ingredients
- 2 packages Birthday Cake Oreos Use sealed packages, room temperature.
- 2 cups Heavy Cream Cold, for best whipping.
- 1 cup Cream Cheese Softened, at room temperature for easy mixing.
- 1 cup Powdered Sugar Sifted if lumpy.
- 1 teaspoon Vanilla Extract Pure vanilla gives best flavor.
- 1/2 cup Colorful Sprinkles Jimmies or non-melting sprinkles.
Instructions
- Chill your mixing bowl and beaters in the fridge for 10 minutes if possible; cold equipment helps heavy cream whip faster.
- In a mixing bowl, pour the 2 cups heavy cream and beat with an electric mixer on medium-high until stiff peaks form, about 3–4 minutes.
- In another large bowl, add 1 cup softened cream cheese, 1 cup powdered sugar, and 1 teaspoon vanilla extract. Beat until smooth and completely lump-free.
- Gently fold the whipped cream into the cream cheese mixture in two additions.
- In a 9×13 inch dish, arrange a single layer of Birthday Cake Oreos across the bottom.
- Spread half of the cream mixture evenly over the Oreo layer.
- Add another full layer of Oreos on top of the cream, pressing gently to ensure contact with the filling.
- Spread the remaining cream mixture over the second layer of Oreos and smooth the surface. Sprinkle 1/2 cup colorful sprinkles across the top.
- Cover the dish tightly with plastic wrap and refrigerate for at least 4 hours, though overnight yields cleaner slices.