
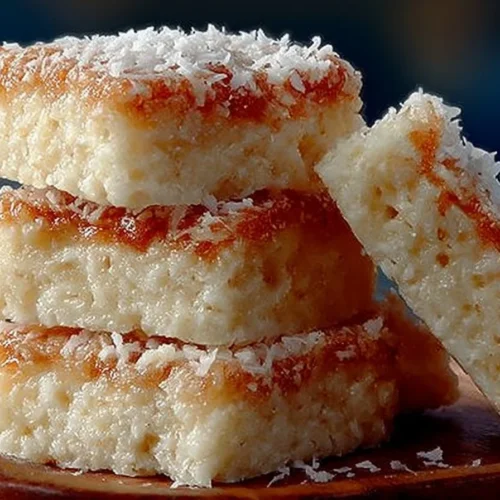
Imagine biting into a bar so lush, chewy, and sweetly coconutty that it instantly transports you to a tropical haven—without heating up your kitchen or turning on an oven! That’s the magic of No-Bake Coconut Bars, your new best friend for quick, fuss-free treats. With just a handful of wholesome ingredients and about 10 minutes of hands-on time, you’ll have a batch of these dreamy snacks ready to chill, making them perfect for busy days, last-minute entertaining, or kid-friendly projects. Fun fact: Coconut desserts have charmed home bakers for generations, but this no-bake version takes out all the guesswork for consistently soft, delectable results. If you loved my No-Bake Chocolate Oat Bars, you’ll swoon for these coconut delights too—both are oven-free and bring sweet joy to any table. So let’s skip the oven, embrace the coconut, and dive into a recipe that’s as easy as it is irresistible!
What is No-Bake Coconut Bars ?
So, what exactly are No-Bake Coconut Bars? The name might sound almost too simple—does it mean what it says? Absolutely! These delightful little wonders require zero baking, just your favorite mixing bowl, and a craving for coconut. Legend has it that a clever home cook, seeking to beat the heat, figured out that coconut’s natural richness creates a bar that needs no oven magic. The rest is snack-time history! As the saying goes, “the way to a man’s heart is through his stomach,” but I’d argue these bars win over everyone’s hearts. Why not whip up a batch today and see how quickly they disappear?
Why You’ll Love This
First of all, the main highlight of No-Bake Coconut Bars is their luscious texture and intense coconut flavor—a real treat for coconut lovers and dessert enthusiasts alike. Say goodbye to store-bought bars loaded with mysterious ingredients and hello to a thrifty, homemade solution that stretches your grocery budget and your snacking smiles. Plus, the simple base can be jazzed up with fun toppings like mini chocolate chips, a drizzle of dark chocolate, or a sprinkle of chopped nuts. Compared to my No-Bake Almond Joy Bites—which are equally decadent but a touch more complex—these bars are even easier and more customizable. Give these creamy, naturally sweetened bars a try and let your creativity (and coconut) shine!
How to Make
Quick Overview
No-Bake Coconut Bars are the answer to every craving: fast, flavorful, and no oven required! All you need are a few pantry staples and a bowl—no fancy tools, just mix, press, and chill. With a prep time of just 10 minutes and a chill time of about 30 minutes, you’ll have a snack ready faster than you can say “coconut paradise.” Their creamy, slightly chewy texture is accented by a hint of vanilla and a satisfying coconut bite, making them an easy favorite for parties, lunchboxes, or as a healthier dessert.
Ingredients
1 cup unsweetened shredded coconut
1/4 cup agave or pure maple syrup (or 1/4 cup water and stevia to taste)
2 tablespoons virgin coconut oil
1/2 teaspoon pure vanilla extract
1/8 teaspoon salt
Optional: mini chocolate chips for topping
Step-by-Step
- In a medium mixing bowl, combine the unsweetened shredded coconut with the agave (or maple syrup) and the coconut oil. If you’re using water and stevia instead of syrup, add the water and sweeten to your preference.
- Mix in the vanilla extract and salt. Stir thoroughly, making sure every bit of coconut gets evenly coated and the mixture is cohesive.
- If you want to add mini chocolate chips, fold them in gently at this stage. For extra decadence, hold some chips for sprinkling over the top!
- Line a small baking dish (about 5×7 inches) or a similar container with parchment paper. Press the coconut mixture firmly and evenly into the bottom, creating a compact, level layer.
- Refrigerate the dish for at least 30 minutes, or until the bars are solid and hold their shape when cut.
- Once chilled, lift the bars out using the edges of the parchment. Cut into even squares or bars, and enjoy!
What to Serve No-Bake Coconut Bars With
No-Bake Coconut Bars pair deliciously with a hot cup of coffee or fragrant herbal tea—think chai or hibiscus for a little extra flair. For a party platter, serve them alongside fresh fruit (mango or pineapple cubes work wonders), crisp almond cookies, or a creamy yogurt dip. Hosting a summer barbecue? They make the perfect light and refreshing dessert following grilled favorites. For a special touch, try them with a scoop of dairy-free vanilla ice cream or drizzled with homemade chocolate sauce.
Top Tips for Perfecting
- Use finely shredded, unsweetened coconut for the best texture and flavor—sweetened flakes may make the bars too soft and overly sweet.
- If coconut oil is too firm, melt it gently before mixing to ensure even distribution.
- Press the mixture firmly into your lined dish to prevent crumbling.
- For nutty undertones, add a tablespoon of almond meal or chopped nuts.
- If you plan to use chocolate chips, let the coconut mixture cool so the chips don’t melt.
Avoid overmixing, as it can make the bars greasy. And don’t skimp on the chilling time; it’s what gives these bars their firm bite!
Storing and Reheating Tips
Store your No-Bake Coconut Bars in an airtight container in the refrigerator—they’ll stay fresh for up to one week. If you want to save them for longer, freeze the cut bars in a single layer, then transfer to a zip-top bag or sealed container. They’ll keep well in the freezer for up to three months. To enjoy, let them thaw at room temperature for about 20 minutes. No reheating is needed, just nibble and enjoy! If serving at a party, keep them chilled until just before putting them out to maintain their shape.
FAQs
Can I make these bars sugar-free?
Yes! Use the water and stevia option in place of syrup for a sugar-free version.
Can I use sweetened coconut?
While you can, sweetened coconut will change the texture and make the bars much sweeter. Adjust the sweetener in the recipe accordingly.
How do I prevent the bars from falling apart?
Make sure to press the mixture firmly and chill it thoroughly before slicing. This helps the bars hold their shape.
Are these bars vegan and gluten-free?
Yes, as long as you use agave or maple syrup (not honey), and check that your coconut products are certified gluten-free.
Can I add other mix-ins?
Absolutely! Try chopped nuts, dried fruit, or even a sprinkle of cocoa powder for a unique twist.
Conclusion
No-Bake Coconut Bars are proof that you don’t need an oven or complicated steps to enjoy a delicious, satisfying treat. With just a few wholesome ingredients, easy instructions, and endless ways to customize, these bars will quickly become your go-to snack for any occasion. Perfect for sharing with friends or sneaking as an afternoon pick-me-up, they’re as rewarding to make as they are to eat. Give them a try, and don’t forget to browse the rest of the blog for more fuss-free, fabulous recipes that will light up your kitchen and your tastebuds!
No-Bake Coconut Bars
Equipment
- Mixing Bowl
- Baking Dish
Ingredients
Ingredients
- 1 cup Unsweetened shredded coconut Finely shredded for best texture
- 1/4 cup Agave or pure maple syrup Can substitute with water and stevia to taste
- 2 tablespoons Virgin coconut oil Melted if too firm
- 1/2 teaspoon Pure vanilla extract
- 1/8 teaspoon Salt
- 1/4 cup Mini chocolate chips Optional for topping
Instructions
- In a medium mixing bowl, combine the unsweetened shredded coconut with the agave (or maple syrup) and the coconut oil. If you’re using water and stevia instead of syrup, add the water and sweeten to your preference.
- Mix in the vanilla extract and salt. Stir thoroughly, making sure every bit of coconut gets evenly coated and the mixture is cohesive.
- If you want to add mini chocolate chips, fold them in gently at this stage. For extra decadence, hold some chips for sprinkling over the top!
- Line a small baking dish (about 5×7 inches) or a similar container with parchment paper. Press the coconut mixture firmly and evenly into the bottom, creating a compact, level layer.
- Refrigerate the dish for at least 30 minutes, or until the bars are solid and hold their shape when cut.
- Once chilled, lift the bars out using the edges of the parchment. Cut into even squares or bars, and enjoy!