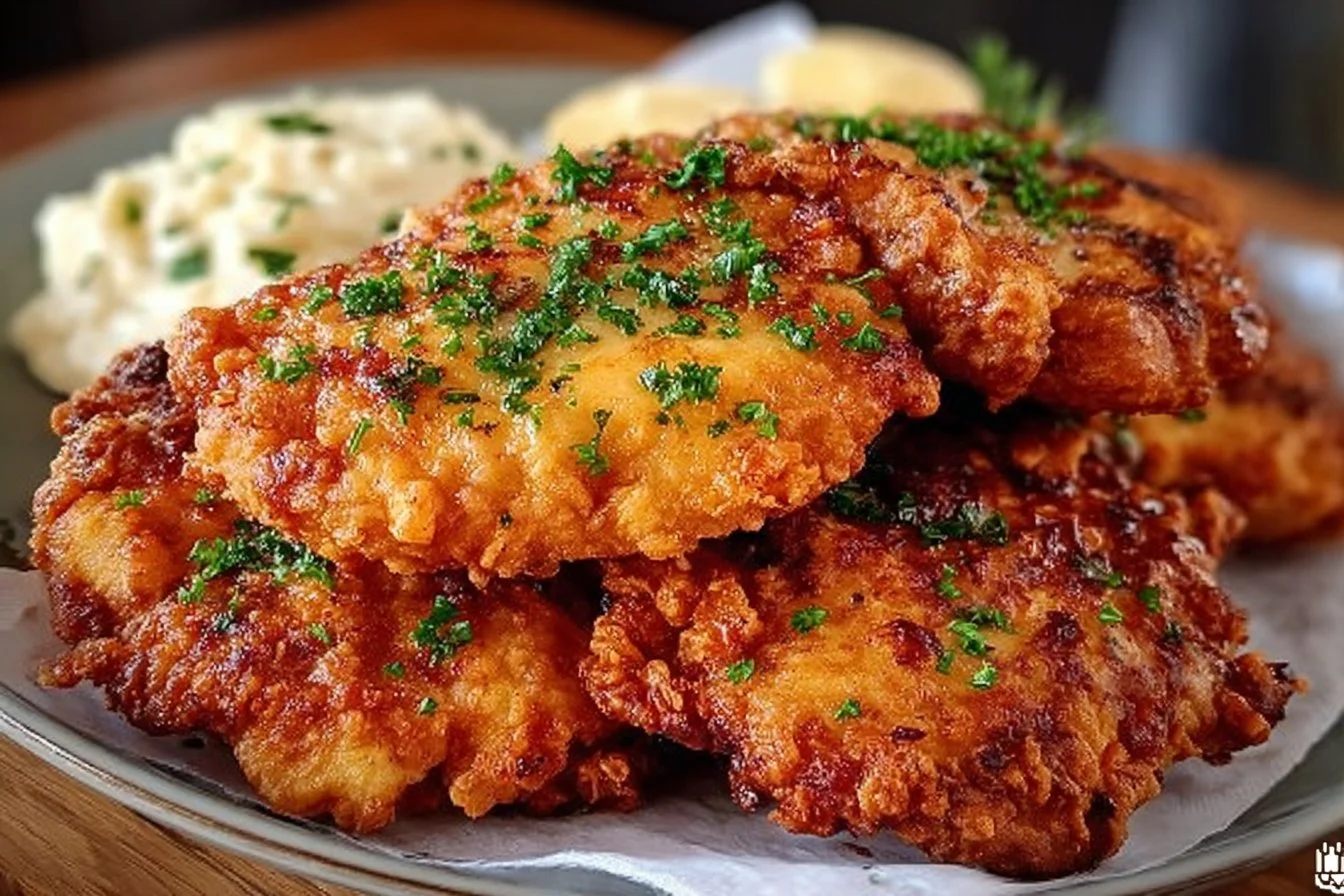
If you’re searching for a meal that’s crispy, tender, and utterly comforting, you have to try Chicken Fried Chicken! This Southern classic brings together the best parts of fried chicken—crunchy coating, juicy meat, and loads of flavor—all in an easy-to-make dish that’s perfect for family dinners or special occasions. Did you know “chicken fried” actually refers to the Texan tradition of frying meat just like you would fry chicken? And that buttery, peppery gravy… It’s famous on its own! This recipe is a reader favorite because it’s quick, forgiving, and incredibly satisfying—similar to the ever-popular Chicken Fried Steak recipe here on the blog. If you loved that, you’ll be delighted by this twist! Get ready to wow your loved ones with a meal that’s both nostalgic and downright delicious.
What is Chicken Fried Chicken?
Ever wonder why we call it “Chicken Fried Chicken” instead of just “Fried Chicken?” It’s a funny name that always sparks conversation at the dinner table! Basically, it’s chicken that’s cooked the same way you’d make chicken fried steak—pounded thin, breaded, fried, and finished with creamy gravy. Why not just call it double-fried? Well, Southern cooks like to keep things interesting. In the end, as the old saying goes, “the way to a man’s heart is through his stomach,” and this dish proves it every time. If you’re a fan of country comfort food and love a good story behind your meal, you’ll have to try making Chicken Fried Chicken for yourself!
Why You’ll Love This
First, the star of the show: these chicken cutlets are ultra-juicy inside and perfectly crispy on the outside, thanks to a flavorful breading and a hot bath in oil. Second, making Chicken Fried Chicken at home is easy on your wallet and lets you skip the takeout line. You can whip up an impressive plateful for a fraction of the cost, and the bonus is that the leftovers taste just as great. And don’t forget the rich, peppery gravy—it’s made from the flavorful pan drippings and takes the meal truly over the top. If you love my recipe for Classic Chicken Tenders, this one’s even heartier and perfect for dinner. Don’t hesitate—your new favorite comfort food awaits!
How to Make Chicken Fried Chicken
Quick Overview
Chicken Fried Chicken checks every box for a weeknight dinner: it’s easy, delicious, and the whole meal comes together in around 35 minutes. With simple pantry staples, crispy breading, and creamy gravy, this recipe is a surefire hit with minimal fuss. The hardest part? Waiting just a few minutes for everything to come together. Serve it piping hot for a truly satisfying bite!
Ingredients
- 6 to 8 thin-sliced chicken breasts
- 2 cups all-purpose flour
- 2 teaspoons baking powder
- 1 teaspoon baking soda
- 1 teaspoon salt
- 1 teaspoon black pepper
- 1 teaspoon garlic powder
- 1 ½ cups buttermilk
- 1 large egg
- 1 tablespoon hot sauce (optional)
- Oil for frying (vegetable or canola recommended)
- ¼ cup reserved oil from frying
- ⅓ cup flour (for gravy)
- 2 cups milk
- Salt and pepper, to taste
Step-by-Step
- Prepare the Chicken: If your chicken breasts aren’t already thin, place them between two sheets of plastic wrap and pound gently with a meat mallet or rolling pin until about ½ inch thick.
- Set Up Breading Stations: In one bowl, combine flour, baking powder, baking soda, salt, pepper, and garlic powder. In a separate bowl, whisk the buttermilk, egg, and hot sauce until well combined.
- Bread the Chicken: Dip each chicken piece first into the buttermilk mixture, then dredge in the seasoned flour, pressing firmly to coat all sides. Repeat for all chicken pieces.
- Heat the Oil: Pour enough oil into a large skillet to coat the bottom generously—about ½ inch deep. Heat to 350°F (medium-high). You’ll know it’s ready when a sprinkle of flour sizzles in the pan.
- Fry the Chicken: Carefully lay breaded chicken (working in batches if needed) into the hot oil. Fry 3-4 minutes per side, or until golden brown and cooked through. Use a thermometer if you have one—165°F in the thickest part is perfect!
- Drain & Rest: Transfer fried chicken pieces to a plate lined with paper towels or a wire rack. Pour off all but ¼ cup oil from the skillet for gravy.
- Make the Gravy: Over medium heat, whisk in ⅓ cup flour to the reserved oil; cook for 1-2 minutes until bubbling but not browned. Slowly add milk, whisking constantly to avoid lumps. Cook until thickened (about 5 minutes), then season to taste with salt and pepper.
- Serve: Pour the creamy gravy generously over the fried chicken. Enjoy it hot!
What to Serve Chicken Fried Chicken With
For a classic Southern meal, pair Chicken Fried Chicken with creamy mashed potatoes and buttery corn on the cob—both are perfect for soaking up that peppery gravy. A fresh green salad or steamed green beans add balance and crunch. For a taste of the South, serve with flaky buttermilk biscuits or homemade coleslaw. For drinks, sweet iced tea or lemonade are always welcome additions. Don’t forget a little extra hot sauce or honey on the side for variety!
Top Tips for Perfecting
- Breading: For the crispiest coating, press the flour mixture firmly into the chicken’s surface, and let your breaded pieces rest on a rack for 10 minutes before frying.
- Temperature: Keep your frying oil hot (350°F). Cooler oil leads to greasy chicken, while oil that’s too hot can burn the crust before the inside cooks.
- Substitutions: No buttermilk? Mix 1 ½ cups milk with 1 tablespoon lemon juice or vinegar and let it sit for 5 minutes.
- Avoid Overcrowding: Fry in batches so oil temperature stays consistent and everything crisps perfectly.
- Gravy Tips: Whisk, whisk, whisk! Smooth gravy is all about gradually adding the milk and stirring constantly.
Storing and Reheating Tips
To store leftovers, let chicken cool completely and keep in an airtight container in the refrigerator for up to 3 days. To freeze, wrap each piece in foil and freeze in a sealed bag; they’ll keep well for up to 2 months. For best results when reheating, place in a 350°F oven for 15-20 minutes until hot. Microwave reheating works, but may make the crust softer—using the oven keeps things crispy. The gravy can be stored separately in a small container in the fridge; reheat gently on the stovetop, whisking in a splash of milk if it thickens too much.
FAQs
Can I use chicken thighs instead of breasts?
Absolutely! Boneless, skinless chicken thighs work beautifully and tend to stay extra juicy.
Is there a way to make this dairy-free?
You can substitute dairy-free milk and lemon juice for buttermilk, and use a dairy-free alternative in the gravy.
How can I make this less spicy for kids?
Simply omit the hot sauce in the marinade, or reduce the amount to taste—plenty of flavor comes from the other spices.
What oil is best for frying?
Choose a neutral, high-smoke point oil like canola or vegetable oil for best results and flavor.
Can I bake instead of fry?
Yes! Place breaded chicken on a wire rack over a baking sheet and bake at 425°F for 18-22 minutes, flipping halfway. It won’t be quite as crispy as frying, but will still taste great.
Conclusion
Chicken Fried Chicken is a celebration of Southern comfort cooking right in your own kitchen—crispy, juicy, and topped with unbelievably creamy gravy. Whether you’re new to frying or a seasoned pro, this recipe’s clear steps, simple ingredients, and family-friendly results make it a must-try for any home cook. Give it a go, and you’ll see why this classic continues to win hearts (and appetites) everywhere. Serve it up and get ready for a plateful of compliments!
Chicken Fried Chicken
Equipment
- Large Skillet
- Mixing Bowl
- Meat Mallet
- Whisk
Ingredients
Chicken
- 6 to 8 pieces thin-sliced chicken breasts
Breading
- 2 cups all-purpose flour
- 2 teaspoons baking powder
- 1 teaspoon baking soda
- 1 teaspoon salt
- 1 teaspoon black pepper
- 1 teaspoon garlic powder
- 1.5 cups buttermilk
- 1 large egg
- 1 tablespoon hot sauce (optional)
Frying Oil
- Oil for frying (vegetable or canola recommended)
- 0.25 cup reserved oil from frying
Gravy
- 0.33 cup flour (for gravy)
- 2 cups milk
Seasoning
- Salt and pepper, to taste
Instructions
- Prepare the Chicken: If your chicken breasts aren’t already thin, place them between two sheets of plastic wrap and pound gently with a meat mallet or rolling pin until about ½ inch thick.
- Set Up Breading Stations: In one bowl, combine flour, baking powder, baking soda, salt, pepper, and garlic powder. In a separate bowl, whisk the buttermilk, egg, and hot sauce until well combined.
- Bread the Chicken: Dip each chicken piece first into the buttermilk mixture, then dredge in the seasoned flour, pressing firmly to coat all sides. Repeat for all chicken pieces.
- Heat the Oil: Pour enough oil into a large skillet to coat the bottom generously—about ½ inch deep. Heat to 350°F (medium-high). You’ll know it’s ready when a sprinkle of flour sizzles in the pan.
- Fry the Chicken: Carefully lay breaded chicken (working in batches if needed) into the hot oil. Fry 3-4 minutes per side, or until golden brown and cooked through. Use a thermometer if you have one—165°F in the thickest part is perfect!
- Drain & Rest: Transfer fried chicken pieces to a plate lined with paper towels or a wire rack. Pour off all but ¼ cup oil from the skillet for gravy.
- Make the Gravy: Over medium heat, whisk in ⅓ cup flour to the reserved oil; cook for 1-2 minutes until bubbling but not browned. Slowly add milk, whisking constantly to avoid lumps. Cook until thickened (about 5 minutes), then season to taste with salt and pepper.
- Serve: Pour the creamy gravy generously over the fried chicken. Enjoy it hot!